
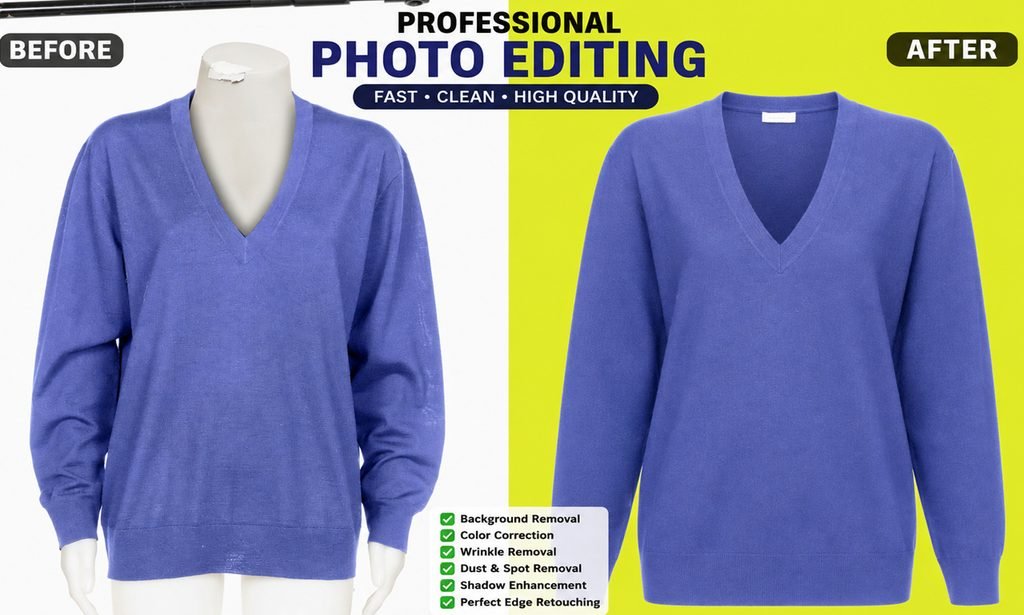
Ghost mannequin photo editing is a popular technique used by fashion brands, clothing retailers, photographers, and e-commerce businesses to showcase apparel without distracting mannequins or models. By combining multiple product images and carefully editing the mannequin area in Adobe Photoshop, editors can create a realistic ghost mannequin effect that gives clothing a clean, professional, and three-dimensional appearance.
For online stores, high-quality apparel images can make products look more attractive and help customers understand the shape, fit, and design of clothing. In this tutorial, we will explore professional ghost mannequin photo editing techniques in Photoshop, from preparing images to creating a seamless invisible mannequin effect.
What Is Ghost Mannequin Photo Editing?
Ghost mannequin editing, also called invisible mannequin or hollow mannequin editing, removes the visible mannequin or model from a clothing photograph while keeping the natural shape and structure of the garment.
For example, a jacket may be photographed on a mannequin from the front. The mannequin is visible around the neck, arms, and body. With professional Photoshop editing, the mannequin can be removed while retaining the inner collar, neckline, sleeves, and other important details. The final image looks as if the clothing is being worn by an invisible person.
This technique is widely used for shirts, T-shirts, jackets, dresses, sweaters, trousers, jeans, and other fashion products.
What You Need Before Editing
Before starting the editing process, prepare the required product photographs. Ideally, you should have:
-
- A front-view clothing image
-
- An inside or back-neck image
-
- Clear and evenly lit photographs
-
- High-resolution product images
-
- Consistent camera angles
-
- Accurate garment colors and textures
Good-quality source images make the editing process faster and help produce a more realistic final result.
Step 1: Open the Images in Photoshop
Start by opening the main clothing photograph and the additional image showing the hidden area of the garment in Adobe Photoshop.
Place the images into separate layers so you can easily compare and combine them. Rename the layers if necessary to keep your workflow organized.
Using layers is important because ghost mannequin editing often requires combining different parts of multiple photographs.
Step 2: Create a Precise Clipping Path
The next step is to isolate the clothing from the mannequin and background. The Pen Tool is commonly used for creating an accurate clipping path around the garment.
Carefully follow the edges of the clothing. Avoid cutting into important details such as:
-
- Sleeves
-
- Collars
-
- Buttons
-
- Zippers
-
- Pockets
-
- Fabric edges
-
- Decorative elements
A precise clipping path creates a clean foundation for the rest of the editing process.
Step 3: Remove the Visible Mannequin
Once the garment has been isolated, remove the visible mannequin areas using layer masks or other non-destructive Photoshop techniques.
Instead of permanently deleting pixels, using a layer mask gives you greater control. You can hide or reveal areas whenever necessary and make revisions without damaging the original image.
The goal is to remove the mannequin while keeping the natural shape of the garment.
Step 4: Add the Inside Neck or Hidden Area
This is one of the most important stages of ghost mannequin editing.
The inside neck area may not be visible in the main photograph because it was covered by the mannequin. Use the additional neck or inside garment photograph to fill this missing section.
Place the required section on a separate layer and align it carefully with the original garment. Use a layer mask to blend the edges naturally.
Pay attention to:
-
- Neckline shape
-
- Fabric texture
-
- Stitching
-
- Shadows
-
- Color
-
- Perspective
Proper alignment helps create a realistic hollow mannequin appearance.
Step 5: Refine Edges and Fabric Details
After combining the garment sections, zoom in and inspect the edges carefully. Remove unwanted pixels, gaps, rough edges, and visible mannequin fragments.
You can use Photoshop tools such as the Pen Tool, Layer Mask, Clone Stamp, Healing Brush, and Brush Tool to refine the image.
Do not over-edit the garment. Preserving natural fabric details is essential for professional e-commerce photography.
Step 6: Correct Color and Lighting
Color consistency is another important part of professional ghost mannequin editing.
Compare the edited sections with the original garment and correct differences in brightness, contrast, saturation, and color temperature. Photoshop adjustment layers such as Curves, Levels, Hue/Saturation, and Color Balance can be useful.
The final clothing color should remain as close as possible to the actual product.
Step 7: Create Natural Shadows
Depending on the client’s requirements, a subtle natural shadow can be added beneath or around the garment.
A realistic shadow can give the product image depth and prevent the clothing from appearing flat or artificially placed.
However, avoid excessive shadows. E-commerce product images usually look cleaner when shadows are soft and subtle.
Step 8: Use a Clean Background
Most online stores prefer white, light gray, or transparent backgrounds for apparel images.
After completing the ghost mannequin effect, make sure the background is clean and consistent across the entire product catalog. Consistent backgrounds can create a more professional appearance for an e-commerce store.
Step 9: Final Quality Check
Before exporting the final image, inspect the entire garment at both high and normal zoom levels.
Check for:
-
- Uneven edges
-
- Visible mannequin parts
-
- Missing fabric
-
- Incorrect colors
-
- Distorted shapes
-
- Unnatural shadows
-
- Dust and unwanted marks
-
- Inconsistent background
A final quality-control check is especially important when editing large batches of clothing images.
Why Ghost Mannequin Editing Is Important for E-commerce
Professional ghost mannequin photo editing allows fashion businesses to display clothing clearly without using a visible mannequin or model. It creates a clean presentation while maintaining the original shape and design of the garment.
For online retailers, consistent apparel images can improve product presentation across product pages, marketplaces, catalogs, and advertising campaigns.
Professional editing is particularly useful for large clothing catalogs where hundreds or thousands of product images need to follow the same visual style.
Professional Ghost Mannequin Editing Services
Although ghost mannequin editing can be completed in Photoshop, producing consistent results across large image volumes requires experience, precision, and attention to detail. Professional ghost mannequin photo editing services can help fashion brands, photographers, clothing manufacturers, and e-commerce businesses save time while maintaining consistent image quality.
A professional workflow combines clipping paths, masking, mannequin removal, neck-joint editing, color correction, background cleanup, and final image enhancement to create polished apparel images.
Conclusion
Ghost mannequin photo editing is an effective Photoshop technique for creating professional apparel images for e-commerce. By using precise clipping paths, layer masks, hidden garment sections, color correction, edge refinement, and natural shadows, you can create a realistic invisible mannequin effect.
Whether you are editing a single fashion product or a large e-commerce catalog, maintaining consistent quality and accurate product details should always be the priority. With the right Photoshop techniques and a structured workflow, ghost mannequin editing can transform ordinary clothing photographs into clean, professional product images ready for online stores.